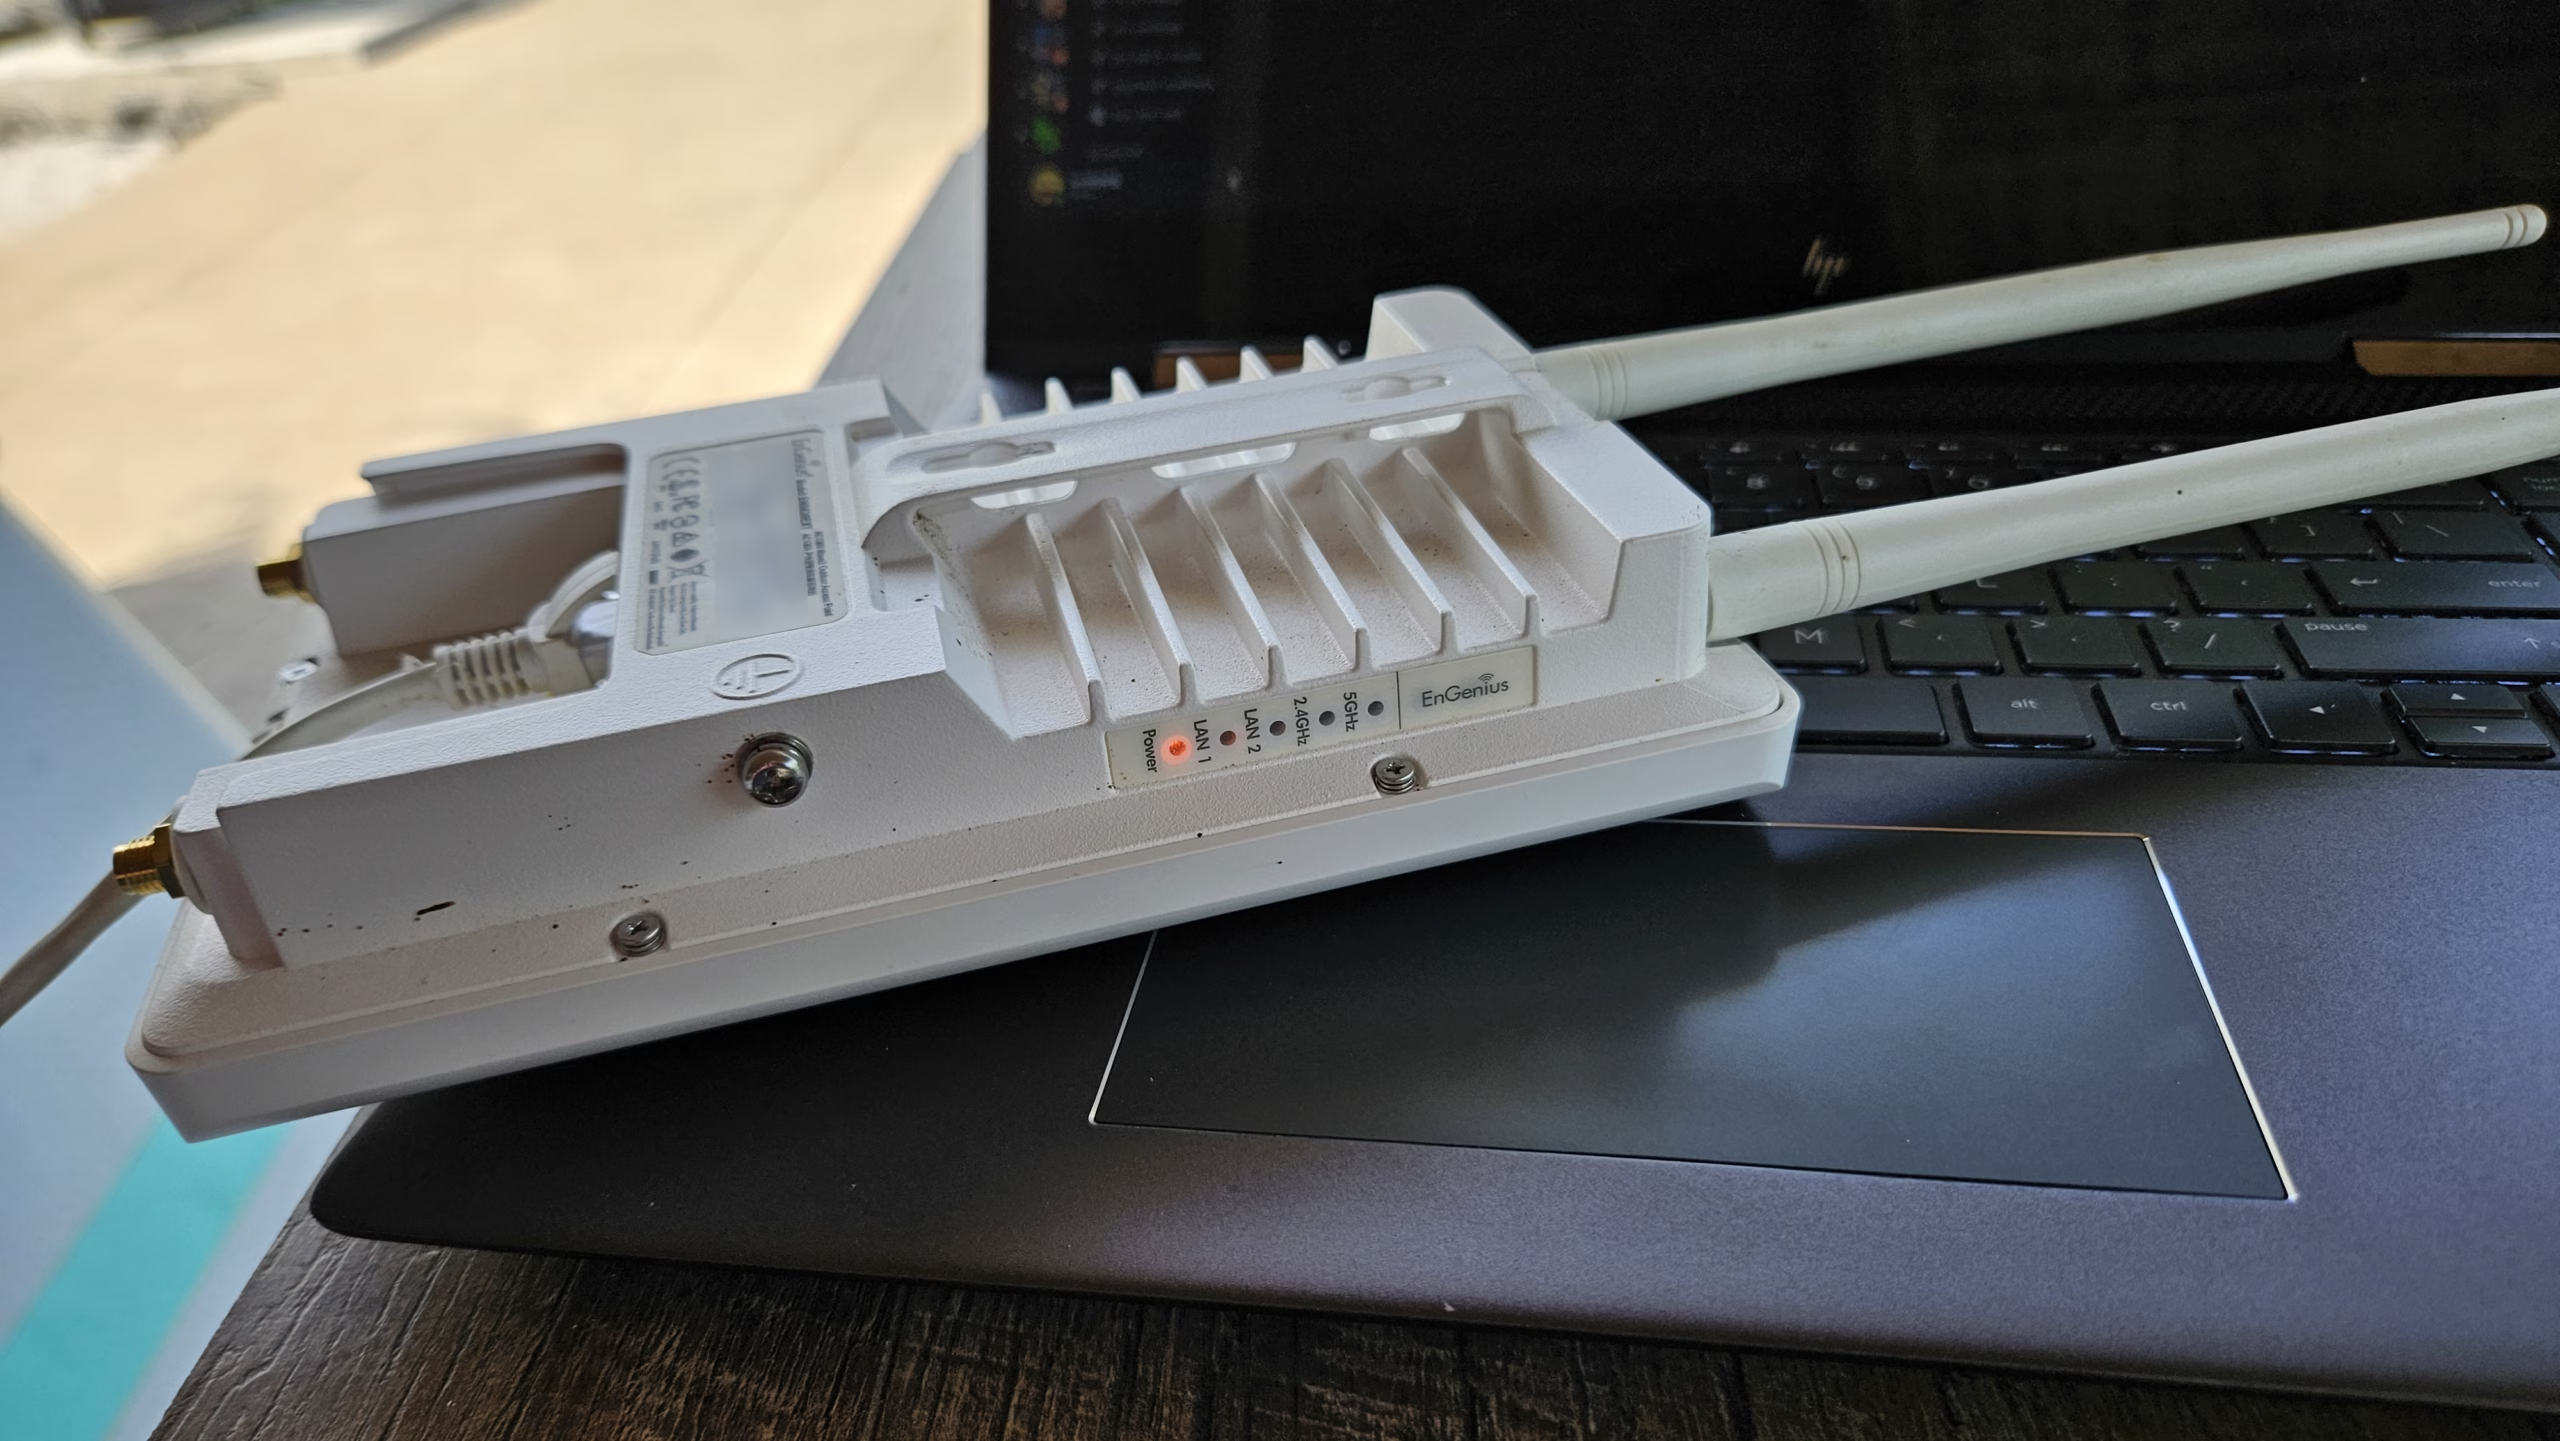
Over the Summer of 2025, I had an adventure with the EnGenius ENS620EXT and by proxy, the ENS500-AC. One of my clients had these devices set up outdoors with the intention to link two buildings together. Neither building had data communication wiring between them, so wireless bridging was the easiest solution. The EnGenius hardware was acquired with the buildings, and hadn’t been in operation for a few years. One device was without the original configuration, and the login credentials to the remaining configured device was not known. The ENS500-AC was situated on the “Remote” building end to act as a WDS Client. The ENS620EXT was set up with an Ethernet link to the rest of the network, acting as a WDS Bridge.
Why WDS? Because we want the Wireless Interface to act as a Virtual Wire Interface. As in, just pass the frames received on an Ethernet bridge interface. Don’t manipulate anything. Need to pass VLANs? No problem!
Let’s Upgrade the Firmware…
Naturally, whenever I introduce used hardware to someone’s network, I will take the time to factory reset the hardware. I will also perform a firmware upgrade as a security and regulatory best practice. Firmware upgrades on the EnGenius ENS500-AC went smoothly, however there was a bit of a snag with the ENS520EXT. The firmware on the ENS620EXT was very old (by several years), and wouldn’t accept the latest firmware on EnGenius’s website. So, the solution was to start looking around the Internet for firmware archives. This is where I was able to locate one such archive, courtesy of a kind Internet Archive user.
The upgrade process was supposed to be a step by step process, by first loading ENS620EXT-int-1.0.0.29-20170302.bin. However, stepping up from this point became unclear. I flashed ENS620EXT_middleFW.bin from the firmware repository on Archive.org, which seemed to go correctly. Then I flashed the contents of ENS620EXT_v3.0.0.33_c1.8.53.rar following the README contained within. The instructions basically state a required a factory reset, followed by a flashing of ENS620EXTaddCAPWAP.bin, then a flashing of ENS620EXT-int-3.0.0.33_C1.8.53.bin. Last I flashed ENS620EXT-int-v3.0.1.1_c1.8.53.bin. Finally, I could install the latest firmware from the EnGenius website, which at the time was version 3.9.3.2.
So all is fine and dandy, right? I click through the Web GUI after performing one more factory reset, and… oh. That’s funny. Why are half of the radio options disabled or un-modifiable? The 5Ghz radio is not activating – what’s up with that? Why is the AP broadcasting the default SSID as expected, but I can’t modify any of the settings? Something has gone terribly wrong. Looking into the problem, the System Logs indicated there were issues with the Radio Regulatory domain not being set. There was also mention of some other boot-level parameters failing to be initialized.
Seeing this, I attempted to perform a firmware downgrade, thinking the latest firmware was bugged. I was met with a device which was failing to boot, and would boot loop every 30 seconds! I would see the network interface come online for about 10 seconds, then go down. Then I would observe the entire unit start to go through the boot cycle again. Uh oh… we have a brick.
The De-Bricking Procedure
This was the fun part to figure out. As it turns out, documentation on the EnGenius Recovery Mode is pretty sparse and hard to find. Here’s what ended up working for me after about an hour of searching and experimentation.
- Power down the Access Point. Make an Ethernet connection between the Access Point and the computer / device you are using to perform the recovery procedure. Since the ENS620EXT is Power over Ethernet, you’ll have an injector in between your device and the ENS620EXT. Your device should be on the “LAN” side of the injector, of course. Don’t use the LAN passthrough port on the ENS620EXT.
- Set a Static IP Address of 192.168.1.50 with a Subnet Mask of 255.255.255.0 onto your device’s Ethernet port. You do not need to set a Gateway. This is Important! Why? As it turns out the Boot Loop issue I was encountering in the previous section is due to the Recovery Mode searching for a device with this IP address. If you don’t do this, the Recovery Mode will not work and the device will just boot loop!
- If you need to force Recovery mode, hold down the Reset button while the Power Light is blinking. Wait until your de-bricking device shows an Ethernet link, then release the button. You may also need to hold down the power button prior to supplying power, as is common with other devices. As I’m writing this post 6 months later, my memory may be a little fuzzy here.
- With the Static IP configured, open a web browser and visit http://192.168.1.1/ . You may also perform a continuous ping to 192.168.1.1 to ensure it is alive and well during the recovery process. Emphasis on specifying HTTP, by the way, as some browsers will try to be “helpful” and use HTTPS. That won’t work.
- The Recovery Interface should appear. Select the last known-good firmware that you loaded onto the device, or the closest equivalent, and click Upload.
- This process usually takes a minute. If you run a continuous ping to the AP, you’ll see the ping times jump from <3ms to 500ms during the flashing process.
- Once the flashing process is complete, the device will go down to ping. Watch the Status lights on the ENS620EXT. You should see the device attempting a normal boot. If you are lucky, the Wireless radios and Ethernet ports should come up, indicating a successful boot.
- You should be good to re-connect the AP to the network and attempt to configure it again. If you need to configure the AP through an Ethernet connection, you should be able to configure it via the LAN Passthrough port on the ENS620EXT. Be sure to set your de-bricking device back to DHCP mode if your network calls for DHCP.
In Step 4, you’ll notice I stated “last known-good firmware.” The reason for this is going to boil down to continuing problems I had following the de-bricking procedure. While I now have an Access Point which is capable of booting up again, no matter what firmware version I tried, the Access Point wouldn’t allow me to configure the necessary radio parameters. I was back at the same problem I had prior to soft bricking the device.
At some point during the chain of firmware upgrades, I must’ve made a mistake. Or the process failed somewhere, as a partition or boot-loader level settings on the device now contain corrupted information. The device still boots, but cannot properly initialize any of the radios or allow for customized settings. I even enabled CLI access on the device, and attempted to perform configurations via the Telnet interface. The settings simply wouldn’t apply. I couldn’t find a way to repair what had happened. Attempts at flashing the 1.0 firmware would cause the device to simply enter recovery mode again. Not even recovery mode would allow the v1.0 firmware to load.
Some futher Internet digging, and some assumptions, led me to believe that EnGenius had updated some critical environmental variable structures at some point. Likely when they incremented the firmware from 1.x to 3.x versioning. Changes like this are usually why step-up upgrade procedures are required. But due to the lack of documentation on how to do this, I was bound to cause an error to occur.
Time to install OpenWRT
At this point, it became pretty evident the EnGenius ENS620EXT is broken in such a way that prevents it from running properly with the factory firmware. I didn’t have the equipment on hand to open the device and attempt to repair it through a JTAG interface. Likewise I can’t access boot-time parameters without JTAG. So my next stab at fixing the ENS620EXT is OpenWRT.
If you don’t know what OpenWRT is, it is a great open source alternative firmware which is capable of running on various hardware devices, including routers made by Linksys, Netgear, D-Link, TP-Link, and EnGenius. You can even flash it onto old Cisco Meraki equipment, and Ubiquiti UAP-AC-Pros. OpenWRT is quite powerful, giving you more control over the radio settings than stock firmware. It allows you to access more advanced routing and switching functionality that is often not included in stock firmware. OpenWRT is not the most user friendly to set up, but it is a great way to better utilize older network gear.
Open source firmware is also great when dealing with manufacturers Linksys and Netgear. It can help to resolve problems when a product is just abandoned prematurely. Other projects such as DD-WRT and FreshTomato are available. If OpenWRT isn’t available for the hardware you’re interested in, try looking at one of those two.
The installation process was honestly just as easy as installing OEM Firmware to the device. I only had to pay attention to what version of the OEM firmware was installed, then load in the correct image as outlined on the OpenWRT Wiki for the ENS620EXT. The installation process went smoothly. After a successful reboot, the device was able to be accessed via the LuCI Web Interface. I even had full control over the radios again!
But wait! There’s more!
Surely it wouldn’t be that easy, right? You’d be correct if you had said that. After configuring OpenWRT onto the device, it was time to power it down and re-install it onto the building. After doing this… the device returned to a bricked state again! This is where things start to not make sense again. The device had installed OpenWRT. It rebooted successfully into OpenWRT. I was even able to trigger a reboot via LuCI and have the device load up without an issue. Why is it bricked?
Well, it turns out, A/B boot partitions are a thing. EnGenius was wise to implement this, but something was still screwed up in the bootloader and causing bootup failures. I entered recovery mode again and re-flashed the OpenWRT image to the device. The configuration remained, and the firmware reloaded. But then I power cycled the device again… and it’s back to boot looping.
This is where I remembered the device has a tendency to boot loop if it is loading into recovery mode. It cannot find a device on the IP Address 192.168.1.50. I reconnected my PC to the ENS620EXT, set a Static IP on my Ethernet adapter, and re-flashed the same OpenWRT image. This time without forcing the Access Point into Recovery mode. The device booted up into OpenWRT successfully, and had the settings I originally configured.
I reboot the device again and… Recovery mode again! :X
At this point I was pretty much losing hope on recovering the device. It seemed as if the bootloader was permanently hosed now without JTAG access. After trying to send the OpenWRT image one more time, the access point rebooted, and loaded up the proper configuration. After power cycling the AP again… success! The firmware loaded up without any intervention, and without Recovery Mode being triggered. For safe measure, I performed a few more power cycles to ensure the device would reboot properly. It did.
After mounting the AP back onto the building, I was able to finish the configuration of a WDS Bridge between the ENS620EXT and ENS500-AC. I achieved a solid 500Mbps over the link with a -55dB signal. Excellent!
The link has been working for several months (as of this post) without a single hiccup per my client. They are happy. I am happy too! Open Source firmware and some patience saves the day.
Summary of Notes
So to recap, here’s some takeaways:
- EnGenius’s support and documentation for devices which are very behind on firmware is quote poor.
- The ENS620EXT is designed well as a product, and has survivability after a soft brick situation. A/B Partitions and ROM Recovery are key to this. Their firmware on the other hand… not so well designed.
- 192.168.1.50 is your friend. Set your PC/Phone/whatever to use this IP address when attempting to access recovery on the ENS620EXT (and similar EnGenius devices).
- Boot Looping means the AP cannot find a device at 192.168.1.50.
- Recovery Mode is ROM-based. So it should load if you power button force it, or if the device fails to boot any firmware.
- The Internet Archive is a great resource. Send them a donation, and maybe contribute your findings to it!
- OpenWRT is capable of functioning properly if your device has corrupted region/radio information in NVRAM which is breaking the stock firmware, that you cannot fix without JTAG/Serial.
- You might need to perform the flashing process a few times to ensure all partitions get updated. I’ve seen this before with some other routers, and this is often called out in the installation instructions by third party firmware. I didn’t see such notices on the OpenWRT Wiki at the time.
Anyways. I hope this is yet another useful post.